
Water Treatment Options
Now that we've covered why you might want to direct plumb in your home espresso machine in part 1 here, this posts looks at how to do so, and water treatment options. Water with the qualities for coffee brewing is extremely important to not only make tasty coffee, but to preserve your equipment. Admittedly, the chemistry of the water and how to manipulate it to the desired values starts to fly over my recollections of AP Chem from junior year of high school. If you're reading this site, chances are you like diving into the deep end though, so I would highly recommend starting with Jim Schulman's Insanely Long Water FAQ's.
Basically, we are looking for water that has some dissolved solids or mineral content so it tastes good and makes good coffee, but has low overall hardness, solids, and balanced levels of other minerals as to not cause any scale, corrosion, or leeching of your boiler and equipment. Most espresso machine manufacturers have a range, and each has their own range, but more or less they all somewhat fall in line with this set of parameters from La Marzocco.
You should start by looking at your water source's water quality reports, which is typically sent by your utility company on an annual basis. Referencing it, you should then test your source water. Most recommend testing hardness with one of these kits that test General and Carbonate Hardness, and you can supplement with some (non-expired) aquarium or pool test strips for pH, nitrate, and nitrite values. Maybe you're lucky enough that your water supply is in line with the target water values, but assuming you're not, you're going to need to treat your water supply.
My initial thought was that various coffee specific systems would tell me either how much it changes water values (this system reduces TDS or hardness by X amount), or if your water source is Y quality, this is what this system will output. The first thing I learned is that many water treatment systems, like inline filters and softeners output a fixed water quality and the more those filters need to "work" or filter out, the more often they will need to be replaced. For example, if your incoming water has a 300 ppm hardness and your system outputs 60 ppm, the filter and softener cartridges will need to be replaced more often than if your incoming water was say 120 ppm total hardness.
So, I knew from my city's water quality report and testing that my water was very hard, with very high TDS, and a high alkalinity. And after reading dozens and dozens of threads and recommendations, I knew that RO systems remove all mineral content which doesn't always taste as good, can cause low water sensors in your machine to not detect the water level, and straight RO water can actually be slightly acidic, corroding your boiler. I knew some counter acted this by adding mixing valves to add tap water back in to the RO supply, but that kind of sounded more involved and science-y than I needed to get. I had also learned that many use a set of generic 10" inline cartridge filters and softeners, connected with John Guest (push connection) tubing. And that Chris' Coffee, who happens to sell basically everything you would need for such a system is pretty helpful in the service regard. So I contacted them to inquire about this kit of theirs.
While doing so, I was messaging with a very knowledgeable moderator at Home-Barista.com to get a second opinion on if it would work. To which he asked what my Chloride levels were, stating that water in his nearby state of New Mexico had high chloride levels, which can leech and corrode your boiler. After contacting my city's water quality department to request this info, I found out that my chloride levels were quite high, and Chris' Coffee very professionally informed me that their system wouldn't lower the chloride. At this point, I was pretty discouraged that despite hours or researching and reading, I now had less of an idea of what water treatment system was needed to get my source water to where it needed to be. That same helpful moderator from Home-Barista.com then suggested I look at an RO system that has a remineralization cartridge incoporated.
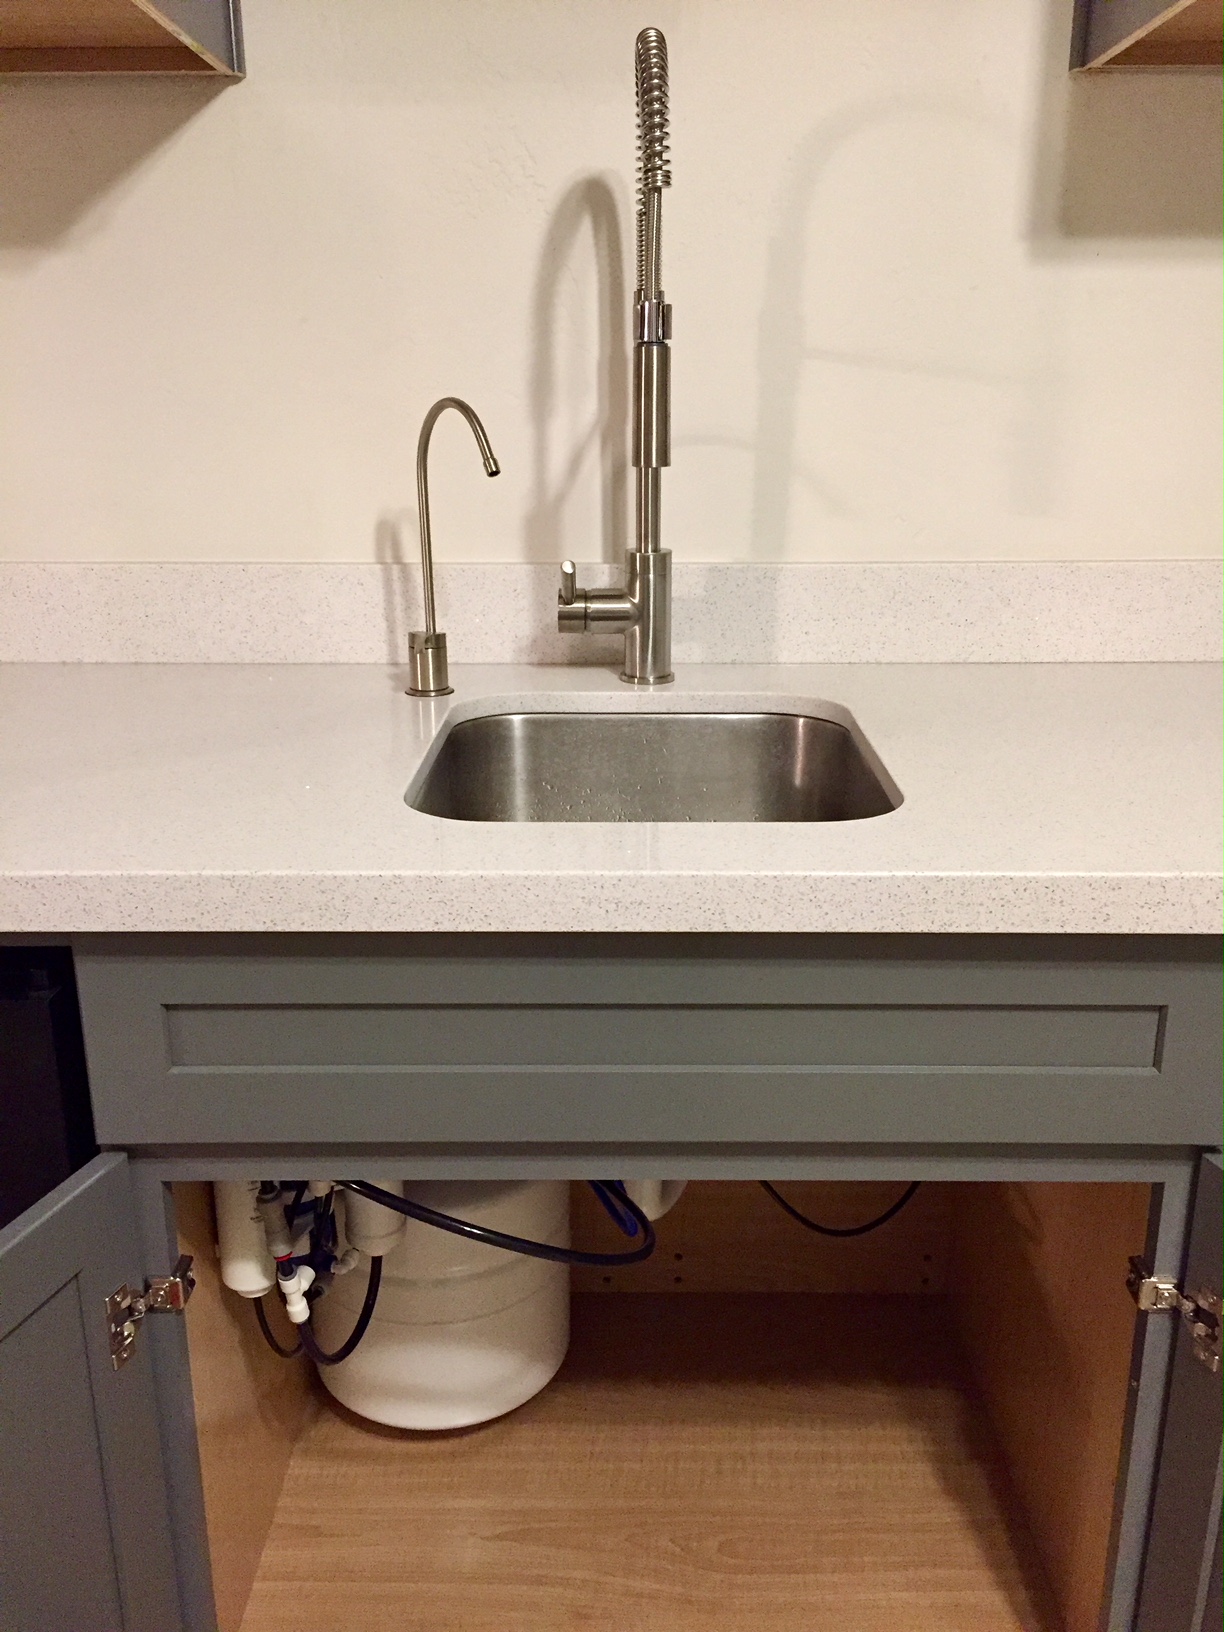
There are a few under counter RO systems with remineralization cartridges that more or less do the same thing. Ultimately, I settled on the Home Master Artesian Full Contact with Permeate Pump. Most of the various systems had options for upgrading the faucet or the tubing size, and I ultimately chose this loaded package, thinking it would just be easier to get the faucet upgrade, larger diameter tubing, the permeate pump, and it already had the T connection to feed an ice machine, which I would use to connect to the espresso machine. The permeate pump aids in speeding up water production and reduces waste water by up to 80% (typical RO systems will waste 4-6 gallons for every 1 gallon of treated water and the permeate pump will cut that down to 1 to 1.5 gallons waste or brine water (water that carries away the impurities)). You could easily get away with the standard system without the permeate pump, without the faucet upgrade, and do a T connection to feed the machine or use the faucet run to connect to the espresso machine. I opted to keep the faucet for kettle filling.

It looks complicated, but it only required 4 screws (two for the filters and two for the permeate pump) and most connections were already made.
Installation was very easy and straight forward following the included directions and videos they have available on youtube. The upgraded faucet looks nicer than the standard chrome plated / black plastic handle spout, and pressure from the system is good. I was slightly worried that I may need to add a pressure regulator to the machine to keep inlet pressure around 2 - 3 bar, but luckily it sits right at 2 to 2.5 bar on its own. One tricky detail is that most espresso machines that come with a hose for the connection have BSP or British Standard Pipe thread which is different than the NPT or National Pipe Thread that is used standard in the US. So depending on your espresso machine and the supplied line, you may need to use an adapter to tie into the RO system. I used this one from EspressoParts.com which allowed the 3/8" BSP female end of the water hose to connect to a 3/8" John Guest or push fit tubing. Had the ice machine feed that came with the Home Master kit been 3/8" tubing, I would have directly connected it, but it was 1/4" standard, so I bought an additional 3/8" to 1/4" John Guest reducing union thinking I would start there and if the pressure was too low, I could replace the 1/4" run with 3/8" tubing or if it was too high, I could then add in a pressure regulator.

The braided steel hose was supplied with my ECM Technika IV Profi machine. You can see it threaded to the gray conversion adapter from espresso parts, and then a reducing union from Home Depot. Both are linked above.
Result
All in, I'm now very happy with system I chose and my finished water values are right where they should be. Total hardness is around 50-60 ppm, pH is between 6.8 and 7.0, TDS should be around the 30 - 60 ppm as well (though I don't have a TDS meter). The line pressure to the machine hovers right around 2 to 2.5 bar and is perfect for line pressure preinfusion, allowing me to manipulate espresso extractions by "pressure profiling" or pulling shots with extended preinfusion and line pressure ramp down at the tail end of the shot. Doing this with Intelligentsia's Tikur Anbessa Single Origin Espresso completely changed the coffee, as detailed in this #whatsCTpulling post.
My Bonavita Variable Temperature Kettle is also scale free now. I was previously filling it with water from my refrigerator with cartridge filter, but with as hard of water as we have in Arizona, I was having to descale it regularly. After using it with the RO water for over a month now, there is no detectable scale forming.
Takeaway
There isn't one right system for water treatment. Unfortunately, it's very dependent on your incoming water quality, so it's just not that cut and dry. My suggestion would be to pull your incoming supply water quality report and do the testing needed to see where you're at and how far you may be from your target values. Your water supply may only need a simple, generic inline cartridge filter system like this one from Chris' Coffee. Also, be sure to test your finish water to make sure you're using water that will make tasty coffee and not cause damage to your equipment. I was surprised by how challenging it was to figure all of this out since I'm certainly not the first person to plumb in their espresso machine, but I hope this series of posts can help guide you through the process and factors that need to be considered. If you have any questions, please feel free to leave them in the comments below; if I don't have an answer, I will do my best to point you in the right direction.
Click through for part 3 in this series looking at the physical considerations of a home coffee setup. Thanks for reading!

Don't let the tubing intimidate you. The red drain line is supposed to be angled/coiled, and many of the others I left a bit long in case I decided to reposition the system. Installation time for this system is less than an hour.